Magnetomettre : HMC5883L


liens WEB:

Voici la documentation du composant Datasheet HMC5883L


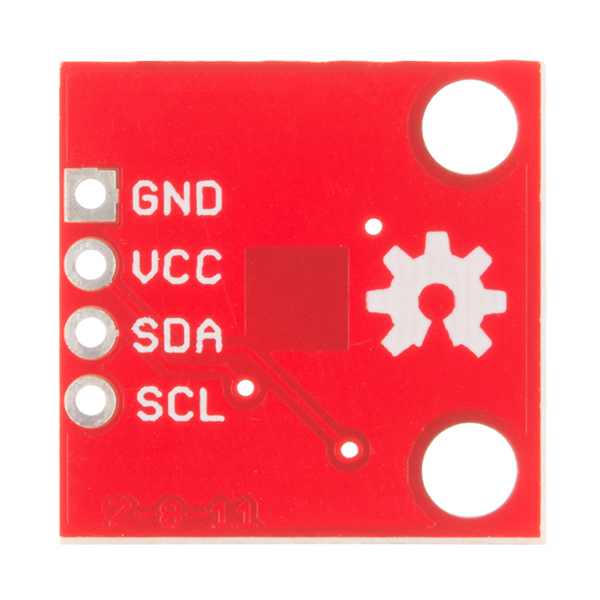
Implantation HMC5883L

La sérigraphie est masqué lorsque le magnétomètre est enfiché dans une breadbord. L’implantation si dessous est donc présentée en vue de dessus (donc sérigraphie cachée)

../../../_images/10530-04.jpg

Installation des librairies quick2wire et i2clibraries

  1. Préparation :

    Si ce n’est pas déjà fait, il faut installer les outils Python :

    sudo apt-get update
    sudo apt-get upgrade
    sudo apt-get install i2c-tools
    sudo apt-get install python3-smbus
            # Quick2wire.i2c peut aussi être utilisé our l'i2c
    
    sudo apt-get install python3
    sudo reboot
    
  2. L’installation et configurations des librairies et outils Quick2wire

    N.B : le lignes qui suivent sont copiées telles quelles depuis la page instructables

    Se positionner à l’endroit ou l’on veut installer quick2wire
    git clone https://github.com/quick2wire/quick2wire-python-api.git
        #get quick2wire from github.com
    
        #if don't have git, try "sudo apt-get install git"
    
    mv ./quick2wire-python-api ./code
        # renaming the quick2wire library folder to code for tidiness,
        # you can skip this if you prefer keeping it original
    
    nano setup.env
        # create a setup file, basically to point out where the quick2wire library is
        # situated for your python>
        # after this line, terminal will enter text editing mode, type in these lines
    
    export QUICK2WIRE_API_HOME=~/project/code
        #change the directory address if different than what i'm using
        #export PYTHONPATH=$PYTHONPATH:$QUICK2WIRE_API_HOME
    
    after that CTRL+X, Y, ENTER to quit, save and overwrite
    
    back in terminal mode
    
    . ./quick2wire.env
        # run the environment setup, run this once every time after reboot,
        # running twice will append the address directory
        # for checking, use "env |grep quick2wire",
        # address shown must be the same with the directory where
        # you install your quick2wire library
    
    cd code
        #go into the quick2wire folder, this will be where you put your python code
    
    git clone https://bitbucket.org/thinkbowl/i2clibraries.git
        #getting library files containing functions for i2c devices such as HMC5883L,
        #ITG-3205, ADXL345 and LCD
    
    Now you can shut it down with "sudo shutdown -h now" so that we can do the wiring
    

Installation des librairies quick2wire et i2clibraries

  1. Préparation :

    Si ce n’est pas déjà fait, il faut installer les outils Python :

    sudo apt-get update
    sudo apt-get upgrade
    sudo apt-get install i2c-tools
    sudo apt-get install python3-smbus
         # Quick2wire.i2c peut aussi être utilisé our l'i2c
    
    sudo apt-get install python3
    sudo reboot
    
  2. L’installation et configurations des librairies et outils Quick2wire

    N.B : le lignes qui suivent sont copiées telles quelles depuis la page instructables

    Se positionner à l’endroit ou l’on veut installer quick2wire
    git clone https://giInstallation des librairies quick2wire et i2clibrariesthub.com/quick2wire/quick2wire-python-api.git
        #get quick2wire from github.com
    
        #if don't have git, try "sudo apt-get install git"
    
    mv ./quick2wire-python-api ./code
        # renaming the quick2wire library folder to code for tidiness,
        # you can skip this if you prefer keeping it original
    
    nano setup.env
        # create a setup file, basically to point out where the quick2wire library is
        # situated for your python
        # after this line, terminal will enter text editing mode, type in these lines
    
    export QUICK2WIRE_API_HOME=~/project/code
        #change the directory address if different than what i'm using
        #export PYTHONPATH=$PYTHONPATH:$QUICK2WIRE_API_HOME
    
    after that CTRL+X, Y, ENTER to quit, save and overwrite
    
    back in terminal mode
    
    . ./quick2wire.env
        # run the environment setup, run this once every time after reboot,
        # running twice will append the address directory
        # for checking, use "env |grep quick2wire",
        # address shown must be the same with the directory where
        # you install your quick2wire library
    
    cd code
        #go into the quick2wire folder, this will be where you put your python code
    
    git clone https://bitbucket.org/thinkbowl/i2clibraries.git
        #getting library files containing functions for i2c devices such as HMC5883L,
        #ITG-3205, ADXL345 and LCD
    
    Now you can shut it down with "sudo shutdown -h now" so that we can do the wiring
    

Configuration du HMC5883L

  1. la déclinaison terrestre

    Pour pouvoir être le plus précis possible, il faut recalibrer la boussole en tenant compte de notre décalage par rapport au pôle magnétique. On appel ça : « la déclinaison terrestre » Pour cela on à besoin de nos coordonnées (les coordonnées du LAB):

    • Longitude : 49° 1’22.48 »N

    • Latitude : 2° 1’50.51 »E

    se qui donne à la date du 18/08/2015 : 0° 9,24”